Dynmap: [Tutorial] Setting up a standalone web server with MySQL/SQLite
I haven't seen any clear instructions on getting a standalone server running with MySQL/SQLite. The wiki page about how to setup the standalone web server is also out of date by a long shot.
After a couple of hours of poking at dynmap. Here's a tutorial on how to get the standalone web server running on NGINX on a *nix server.
🔴 WARNING 🔴
Following this guide will reset all the data if you are _currently not_ using a SQL database with dynmap. All your rendered tiles will be lost since Dynmap will start saving/loading from the database after you follow this tutorial.
Using MySQL with Dynmap is not fully tested by the community. Use as your own risk
This tutorial assumes that you know a little bit of Linux. If you don't know how to Linux, it's never too late to learn!
If you are using a "minecraft server host". In most cases, you won't be able to setup a standalone web server with your minecraft server host. You will have to get website host or a vps to host a standalone web server for Dynmap.
Notes
Would highly recommend you to use MySQL instead of SQLite if you have the choice. It may require some extra steps but look on the bright side. You can use MySQL with other plugins :)
This tutorial also requires you to use sudo. If you don't have sudo perms then you are either out of luck or you can rent a VPS.
- If you are using SQLite, you cannot host the standalone web server on a different server/vps. You will have to migrate the SQLite database to a MySQL/MariaDB server in order to host the standalone server on a different server/vps. But that is completely optional, we will still be covering how to setup a standalone web server on the same server as the minecraft server with SQLite.
- I won't be covering how to setup a standalone web server with windows or apache unless there are some interest. As an alternative, you can get a cheap VPS and host a web server there if you are using MySQL (not SQLite).
Note to contributors
If you give me permission to edit wiki. I will gladly make a contribution to the wiki on how to setup a standalone webserver and maintain it ;)
Bonus Tutorials
I cover how to get the standalone web server working with cloudflare's proxy which is completely optional. This is HIGHLY recommended if you're going to enable users to log in to the dynmap website. If are going to install a SSL cert with certbot instead, don't follow this part of the bonus tutorial.
I will also cover how to install a SSL cert to the NGINX web server with certbot or another provider which is completely optional. This is HIGHLY recommended if you're going to enable users to log in to the dynmap website. If you are want to use the cloudflare proxy instead, don't follow this part of the bonus tutorial.
Pros and Cons
Pros:
- The Dynmap website will be available even if the minecraft server is down/restarting
- Put less load on the minecraft server
- NGINX has better performance than the internal webserver
Cons:
- Kinda annoying to setup
- Need to know a bit of linux
What we are going to cover
We will be covering these following things
- Setting up MySQL/MariaDB (optional)
- Setting up NGINX with PHP and SQL support
- Preparing the Dynmap plugin to use with MySQL/SQLite
- Setting up the standalone server for MySQL/SQLite
- Bonus: Setting up a cloudflare proxy with the NGINX web server (optional)
- Bonus: Setting up NGINX with ssl certifications (optional)
- The FAQ's are located at the very bottom of this guide.
Setting up MySQL/MariaDB and NGINX with PHP and SQL support on your server
To get started, you need to install a web server on the server you want to host the standalone dynmap website on. This part of the tutorial also covers installing MySQL on the server as well.
If you want to use SQLite for some reason, you can just install NGINX without MySQL/MariaDB. BUT NGINX must be on the same server where the minecraft server is hosted.
If you are using a website host or using a minecraft host. See notes below the tutorial links.
Where should I install MySQL/MariaDB?
You should generally install MySQL on the same server as the minecraft server. You can use the same MySQL server with plugins that uses MySQL. MySQL will be used by the Dynmap plugin to save/load data which the web server will read/write to as well.
Generally, there are more benefits if the MySQL/MariaDB server is on the same server/network as the minecraft server since the latency would be lower
Tutorials
There are countless tutorials on how to setup nginx/MySQL/MariaDB on the internet. Here are some links of tutorials on setting them up with some linux OS's.
Don't worry if the tutorial tells you to install MariaDB since it's pretty much the same thing as MySQL.
Links to tutorials
Test to see if your web server is serving a webpage by putting in your web server's ip into your web browser. If nothing pops up, then your firewall might be blocking the port or you didn't start the nginx server.
notes
- If you already have a web server, you can skip this step. BUT you still need a MySQL server if you don't have one already.
- If you are using a website host, like stated above. You can skip this step BUT you still need a MySQL server.
- If you are using a minecraft host, you will need to get a VPS/website host. Hopefully your minecraft host also includes a MySQL server with your package. If not, I guess you can install the MySQL server on the VPS BUT MAKE SURE YOU HAVE PLENTY OF SPACE.
Setting up MySQL (Skip this step if you are using SQLite)
Now, to setup the MySQL/MariaDB server.
It is recommended to create a new user/password with limited permissions for each application.
If you are setting up an external web server, you can also setup a firewall (iptables/firewalld/ufw/etc) to only allow the web server to connect to the database.
Configurating the MySQL/MariaDB database
Using a terminal on the server that is hosting the minecraft server, we will create a new database and add some database users.
Creating a new database in MySQL/MariaDB
mysql -u root -p
[Enter mysql root password if there is one]
mysql> CREATE DATABASE <dynmap_database_name>;
mysql> exit
Example (click to expand)
mysql -u root -p
[Enter mysql root password if there is one]
mysql> CREATE DATABASE MyDynmapDatabase;
mysql> exit
Add new users
note
If the MySQL server is on the same server as the minecraft server. <minecraftserver_ip> should just be localhost
mysql -u root -p
[Enter mysql root password if there is one]
mysql> CREATE USER '<webserver_user>'@'<webserver_ip>' IDENTIFIED BY '<password>';
mysql> CREATE USER '<dynmap_user>'@'<minecraftserver_ip>' IDENTIFIED BY '<password>';
mysql> GRANT CREATE, DELETE, INSERT, SELECT, UPDATE ON <dynmap_database>.* TO '<webserver_user>'@'<webserver_ip>';
mysql> GRANT CREATE, DELETE, INSERT, SELECT, UPDATE ON <dynmap_database>.* TO '<dynmap_user>'@'<minecraftserver_ip>';
mysql> FLUSH PRIVILEGES;
mysql> exit
Example if the web server and minecraft server are on the same server (click me to expand)
mysql -u root -p
[Enter mysql root password if there is one]
mysql> CREATE USER 'dynmapwebserver'@'localhost' IDENTIFIED BY 'password1234';
mysql> CREATE USER 'minecraftserver'@'localhost' IDENTIFIED BY 'password5678';
mysql> GRANT CREATE, DELETE, INSERT, SELECT, UPDATE ON MyDynmapDatabase.* TO 'dynmapwebserver'@'localhost';
mysql> GRANT CREATE, DELETE, INSERT, SELECT, UPDATE ON MyDynmapDatabase.* TO 'minecraftserver'@'localhost';
mysql> FLUSH PRIVILEGES;
mysql> exit
If you made an oopsie and need to delete the mysql user. This is how you delete a user.
mysql> DROP USER '<user_to_delete>'@'<ip_you_used>';
After you create a new user, try logging into the user. (after you logout from the mysql root user via "exit")
mysql -u <webserver_user> -p
[Enter user password]
mysql> exit
MySQL Privileges/Permissions
MySQL has these permissions available to set to MySQL users.
- ALL PRIVILEGES - Grant all privileges to the user
- CREATE - Allows user to create databases/tables
- DELETE - Allows user to delete rows(data) from a table
- DROP - Allows user to drop databases and tables
- INSERT - Allows user to insert rows(data) to a table
- SELECT - Allows user to read from a database
- UPDATE - Allows user to update data in a table
Prepping the Dynmap plugin
Now to change some settings in configuration from the plugin.
Install Dynmap
Install the latest version of dynmap on the server. The latest version should still work with the minecraft version from 1.10 to 1.14
Turn it on and turn it off
Turn on the minecraft server then stop the server. There should be a new folder called dynmap in the plugins folder.
MAKE A BACKUP of the configuration.txt file! Just make a copy and name it something like configuration.txt.backup.
Open the configuration file configuration.txt so we can change some settings.
Changing the Storage
Change the storage section in the configuration from
storage:
  # Filetree storage (standard tree of image files for maps)
  type: filetree
  # SQLite db for map storage (uses dbfile as storage location)
  #type: sqlite
  #dbfile: dynmap.db
  # MySQL DB for map storage (at 'hostname':'port' with flags "flags" in database 'database' using user 'userid' password 'password' and table prefix 'prefix')
  #type: mysql
  #hostname: localhost
  #port: 3306
  #database: dynmap
  #userid: dynmap
  #password: dynmap
  #prefix: ""
  #flags: "?allowReconnect=true"
to
MySQL Example (Click to expand)
storage:
  # Filetree storage (standard tree of image files for maps)
  #type: filetree <- DONT FORGET TO COMMENT THIS OUT
  # SQLite db for map storage (uses dbfile as storage location)
  #type: sqlite
  #dbfile: dynmap.db
  # MySQL DB for map storage (at 'hostname':'port' with flags "flags" in database 'database' using user 'userid' password 'password' and table prefix 'prefix')
  type: mysql
  hostname: <mysql_ip>
  port: <mysql_port>
  database: <mysql_database>
  userid: <dynmap_mysql_user>
  password: <dynmap_mysql_password>
  prefix: "" # Can add prefix for tables if you want
  flags: "?allowReconnect=true"
SQLite Example (Click to expand)
storage:
  # Filetree storage (standard tree of image files for maps)
  #type: filetree <- DONT FORGET TO COMMENT THIS OUT
  # SQLite db for map storage (uses dbfile as storage location)
  type: sqlite
  dbfile: dynmap.db
  # MySQL DB for map storage (at 'hostname':'port' with flags "flags" in database 'database' using user 'userid' password 'password' and table prefix 'prefix')
  #type: mysql
  #hostname: localhost
  #port: 3306
  #database: dynmap
  #userid: dynmap
  #password: dynmap
  #prefix: ""
  #flags: "?allowReconnect=true"
Changing Some Component Settings
Right under the storage section, there should be a section called
- class: org.dynmap.InternalClientUpdateComponent that we will be commenting out.
So it would look like this:
Before (click to expand)
  - class: org.dynmap.InternalClientUpdateComponent
    sendhealth: true
    sendposition: true
    allowwebchat: true
    webchat-interval: 5
    hidewebchatip: true
    trustclientname: false
    includehiddenplayers: false
    # (optional) if true, color codes in player display names are used
    use-name-colors: false
    # (optional) if true, player login IDs will be used for web chat when their IPs match
    use-player-login-ip: true
    # (optional) if use-player-login-ip is true, setting this to true will cause chat messages not matching a known player IP to be ignored
    require-player-login-ip: false
    # (optional) block player login IDs that are banned from chatting
    block-banned-player-chat: true
    # Require login for web-to-server chat (requires login-enabled: true)
    webchat-requires-login: false
    # If set to true, users must have dynmap.webchat permission in order to chat
    webchat-permissions: false
    # Limit length of single chat messages
    chatlengthlimit: 256
  #  # Optional - make players hidden when they are inside/underground/in shadows (#=light level: 0=full shadow,15=sky)
  #  hideifshadow: 4
  #  # Optional - make player hidden when they are under cover (#=sky light level,0=underground,15=open to sky)
  #  hideifundercover: 14
  #  # (Optional) if true, players that are crouching/sneaking will be hidden
    hideifsneaking: false
    # If true, player positions/status is protected (login with ID with dynmap.playermarkers.seeall permission required for info other than self)
    protected-player-info: false
    # If true, hide players with invisibility potion effects active
    hide-if-invisiblity-potion: true
    # If true, player names are not shown on map, chat, list
    hidenames: false
After (click to expand)
 # - class: org.dynmap.InternalClientUpdateComponent
    #sendhealth: true
    #sendposition: true
    #allowwebchat: true
    #webchat-interval: 5
    #hidewebchatip: false
    #trustclientname: false
    #includehiddenplayers: false
    # (optional) if true, color codes in player display names are used
    #use-name-colors: false
    # (optional) if true, player login IDs will be used for web chat when their IPs match
    #use-player-login-ip: true
    # (optional) if use-player-login-ip is true, setting this to true will cause chat messages not matching a known player IP to be ignored
    #require-player-login-ip: false
    # (optional) block player login IDs that are banned from chatting
    #block-banned-player-chat: true
    # Require login for web-to-server chat (requires login-enabled: true)
    #webchat-requires-login: false
    # If set to true, users must have dynmap.webchat permission in order to chat
    #webchat-permissions: false
    # Limit length of single chat messages
    #chatlengthlimit: 256
  #  # Optional - make players hidden when they are inside/underground/in shadows (#=light level: 0=full shadow,15=sky)
  #  hideifshadow: 4
  #  # Optional - make player hidden when they are under cover (#=sky light level,0=underground,15=open to sky)
  #  hideifundercover: 14
  #  # (Optional) if true, players that are crouching/sneaking will be hidden
    #hideifsneaking: false
    # If true, player positions/status is protected (login with ID with dynmap.playermarkers.seeall permission required for info other than self)
    #protected-player-info: false
    # If true, hide players with invisibility potion effects active
    #hide-if-invisiblity-potion: true
    # If true, player names are not shown on map, chat, list
    #hidenames: false
Right after you do that, you will uncomment the section right below that.
So it will look like this.
Before (click to expand)
  #- class: org.dynmap.JsonFileClientUpdateComponent
  #  writeinterval: 1
  #  sendhealth: true
  #  sendposition: true
  #  allowwebchat: true
  #  webchat-interval: 5
  #  hidewebchatip: false
  #  includehiddenplayers: false
  #  use-name-colors: false
  #  use-player-login-ip: false
  #  require-player-login-ip: false
  #  block-banned-player-chat: true
  #  hideifshadow: 0
  #  hideifundercover: 0
  #  hideifsneaking: false
  #  # Require login for web-to-server chat (requires login-enabled: true)
  #  webchat-requires-login: false
  #  # If set to true, users must have dynmap.webchat permission in order to chat
  #  webchat-permissions: false
  #  # Limit length of single chat messages
  #  chatlengthlimit: 256
  #  hide-if-invisiblity-potion: true
  #  hidenames: false
After (click to expand)
  - class: org.dynmap.JsonFileClientUpdateComponent
    writeinterval: 1
    sendhealth: true
    sendposition: true
    allowwebchat: true
    webchat-interval: 5
    hidewebchatip: false
    includehiddenplayers: false
    use-name-colors: false
    use-player-login-ip: false
    require-player-login-ip: false
    block-banned-player-chat: true
    hideifshadow: 0
    hideifundercover: 0
    hideifsneaking: false
  #  # Require login for web-to-server chat (requires login-enabled: true)
    webchat-requires-login: false
  #  # If set to true, users must have dynmap.webchat permission in order to chat
    webchat-permissions: false
  #  # Limit length of single chat messages
    chatlengthlimit: 256
    hide-if-invisiblity-potion: true
    hidenames: false
Disabling the internal web server
Now we are going to disable the internal web server since we don't need it anymore.
Find disable-webserver in the configuration file and change the value from false to true.
Changing some urls for the web server
We are going to change some urls that is required for the dynmap standalone web server to work. This is the huge part most people had trouble with as far as I know.
Find the url: section in the configuration file. It should look like this.
Before (click to expand)
url:
    # configuration URL
    #configuration: "up/configuration"
    # update URL
    #update: "up/world/{world}/{timestamp}"
    # sendmessage URL
    #sendmessage: "up/sendmessage"
    # login URL
    #login: "up/login"
    # register URL
    #register: "up/register"
    # tiles base URL
    #tiles: "tiles/"
    # markers base URL
    #markers: "tiles/"
After [MySQL Example] (click to expand)
url:
    # configuration URL
    configuration: "standalone/MySQL_configuration.php"
    # update URL
    update: "standalone/MySQL_update.php?world={world}&ts={timestamp}"
    # sendmessage URL
    sendmessage: "standalone/MySQL_sendmessage.php"
    # login URL
    login: "standalone/MySQL_login.php"
    # register URL
    register: "standalone/MySQL_register.php"
    # tiles base URL
    tiles: "standalone/MySQL_tiles.php?tile="
    # markers base URL
    markers: "standalone/MySQL_markers.php?marker="
After [SQLite Example] (click to expand)
url:
    # configuration URL
    configuration: "standalone/configuration.php"
    # update URL
    update: "standalone/update.php?world={world}&ts={timestamp}"
    # sendmessage URL
    sendmessage: "standalone/sendmessage.php"
    # login URL
    login: "standalone/login.php"
    # register URL
    register: "standalone/register.php"
    # tiles base URL
    tiles: "standalone/tiles.php?tile="
    # markers base URL
    markers: "standalone/markers.php?marker="
Turn it on and off again
Start the minecraft server BUT DON'T TURN IT OFF JUST YET!
Check and see if there are any issues with dynmap by checking the latest log. If there are no issues, then turn off the server.
NOTICE
The main reason why you need to start and stop the server at the very end is because Dynmap creates configuration files for the web server to use. If you changed any settings in configuration.txt, then there is a chance that the config files in plugins/dynmap/web are changed.
EVEN BIGGER NOTICE
If you are going to enable users to log into dynmap. You should DEFINITELY install a SSL cert or use cloudflare's proxy to make login credentials secure from the bad guys!
Options on how the web server should be setup
Now we get down to the serious business!
Here are some options:
Hosting on the same server with the minecraft server (MySQL/SQLite)
Option 1: You can link the web server to the dynmap web folder in the plugin folder (easier)
Option 2: Copy the web folder to a different location on the server (more secure)
Hosting on a different server that's not the same server as the minecraft server (MySQL)
Only Option: Your only option is to copy the web folder to the server that has the web server.
Hosting with a web host (MySQL)
If you're using a web host such as hostgator, namecheap, 000webhost, etc. Your only option is to copy the web folder to the web host.
I won't be adding details on how to get this done since there are too many web hosts to cover.
General setup with the NGINX web server
Before you go to the next sections with the setup options. We will cover the general setup for the NGINX web servers.
Removing the default website config
If you installed a fresh NGINX web server. We want to remove the default website config and add our own config. If you already have a NGINX before this tutorial and know what you're doing. Go to the next section with options on how the dynmap website should be setup.
The default config is usually located at /etc/nginx/sites-available/ and /etc/nginx/sites-enabled.
You want to make a copy of the default since we will be using it.
sudo cp /etc/nginx/sites-available/default /etc/nginx/sites-available/dynmap
Now remove the default config from sites-enabled to disable the default site config and restart the nginx web server
sudo rm /etc/nginx/sites-enabled/default
sudo service nginx restart
Setting up the web server that's on the same server as the minecraft server
If you are hosting your own NGINX web server on the same server as the minecraft server. This is the right section for you!
Note
Make sure that you followed the general setup with NGINX before you continue with this tutorial
Option 1: Linking the web server to the dynmap folder (click to expand)
If you want to setup the web server the easy (but not too secure) way. This is the right option for you! But I still highly recommend you to follow option 2 since it's a more secure option than option 1.
Pros:
- One command less to execute (if you're into that kind of thing)
- Don't need to copy over config files if you change the dynmap configuration
Cons:
- Less secure compared to Option 2 (debatable)
Editing the website config file
Start editing the dynmap config file in /etc/nginx/sites-available/dynmap
sudo nano /etc/nginx/sites-available/dynmap
OR
sudo vi /etc/nginx/sites-available/dynmap
The config file should look something like this. Change the values in the config to your liking
server {
        listen 80 default_server;
        listen [::]:80 default_server;
        server_name map.example.com;

        root /home/<USERNAME>/<MINECRAFTSERVER>/plugins/dynmap/web;

        index index.php index.html index.htm;

        location / {
                # First attempt to serve request as file, then
                # as directory, then fall back to displaying a 404.
                try_files $uri $uri/ =404;
        }

        # pass PHP scripts to FastCGI server

        location ~ \.php$ {
                include snippets/fastcgi-php.conf;

                # With php-fpm (or other unix sockets):
                fastcgi_pass unix:/var/run/php/php7.2-fpm.sock;
        #       # With php-cgi (or other tcp sockets):
        #       fastcgi_pass 127.0.0.1:9000;
        }

        # deny access to .htaccess files, if Apache's document root
        # concurs with nginx's one
        #
        location ~ /\.ht {
                deny all;
        }
}
- Don't forget to change
to the linux username that has the minecraft server folder in it. - Don't forget to change
to the folder that you have the minecraft server in
Example:
root /home/someuser/minecraft/servers/creative/plugins/dynmap/web;
Option 2: Copying the web folder to a different location
If you want to setup the web server the more secure way. This is the right option for you!
Pros:
- More secure than Option 1 (Debatable)
Cons:
- Need to copy over some config files to new location if you changed the dynmap configuration
Copying the files to a new location
Copy over the dynmap web files to a different location
sudo cp -r /home/<USERNAME>/<MINECRAFTSERVER>/plugins/dynmap/web/ /var/www/dynmap/
- Don't forget to change
to the linux username that has the minecraft server folder in it. - Don't forget to change
to the folder that you have the minecraft server in
Example:
sudo cp -r /home/MyUsername/minecraft/servers/creative/plugins/dynmap/web/ /var/www/dynmap/
Editing the website config file
Start editing the dynmap config file in /etc/nginx/sites-available/dynmap
sudo nano /etc/nginx/sites-available/dynmap
OR
sudo vi /etc/nginx/sites-available/dynmap
The config file should look something like this. Change the values in the config to your liking
server {
        listen 80 default_server;
        listen [::]:80 default_server;
        server_name map.example.com;

        root /var/www/dynmap;

        index index.php index.html index.htm;

        location / {
                # First attempt to serve request as file, then
                # as directory, then fall back to displaying a 404.
                try_files $uri $uri/ =404;
        }

        # pass PHP scripts to FastCGI server

        location ~ \.php$ {
                include snippets/fastcgi-php.conf;

                # With php-fpm (or other unix sockets):
                fastcgi_pass unix:/var/run/php/php7.2-fpm.sock;
        #       # With php-cgi (or other tcp sockets):
        #       fastcgi_pass 127.0.0.1:9000;
        }

        # deny access to .htaccess files, if Apache's document root
        # concurs with nginx's one
        #
        location ~ /\.ht {
                deny all;
        }
}
Now lets make the dynmap server public! (for both options 1 and 2)
After you followed the steps in Option 1/2. We are going to make a shortcut of the dynmap web server config and put it in a folder.
ln -s /etc/nginx/sites-available/dynmap /etc/nginx/sites-enabled/dynmap
Make sure the config files are error-free!
nginx -t -c /etc/nginx/sites-available/dynmap
and restart the server if there are no problems.
sudo service nginx restart
And that should be it!
Put the web server ip into your web browser, you should see dynmap. Since it's going to be empty, you can start rendering tiles by joining the server and running the command /dynmap fullrender <worldname>
Setting up the web server that's hosted on a different server
If you are hosting your own NGINX web server on a different server than the server that's hosting the minecraft server. This is the right section for you!
Note
- Make sure that you followed the general setup with NGINX before you continue with this tutorial
- The website configs should be on the server hosting the NGINX web server, not the server hosting the minecraft server!
Pros:
- Even more secure than the other methods
Cons:
- Need to copy over some config files to new location if you changed the dynmap configuration
Copying the files to a new location
Copy over the dynmap web files to a different location
Execute this command on the server that is hosting the minecraft server. This command will copy the folder from the minecraft server over to the web server. It will ask you for the password to the webserver.
sudo scp -r /home/<USERNAME>/<MINECRAFTSERVER>/plugins/dynmap/web <WEBSERVER_USERNAME>@<WEBSERVER_IP>:/var/www/dynmap
- Don't forget to change
to the linux username of the server that has the minecraft server folder in it. - Don't forget to change
to the folder that you have the minecraft server in - Don't for
Example:
sudo scp -r /home/SomeUserName1/minecraft/servers/creative/plugins/dynmap/web [email protected]:/var/www/dynmap
Editing the website config file
Start editing the dynmap config file in /etc/nginx/sites-available/dynmap
sudo nano /etc/nginx/sites-available/dynmap
OR
sudo vi /etc/nginx/sites-available/dynmap
The config file should look something like this. Change the values in the config to your liking
server {
        listen 80 default_server;
        listen [::]:80 default_server;
        server_name map.example.com;

        root /var/www/dynmap;

        index index.php index.html index.htm;

        location / {
                # First attempt to serve request as file, then
                # as directory, then fall back to displaying a 404.
                try_files $uri $uri/ =404;
        }

        # pass PHP scripts to FastCGI server

        location ~ \.php$ {
                include snippets/fastcgi-php.conf;

                # With php-fpm (or other unix sockets):
                fastcgi_pass unix:/var/run/php/php7.2-fpm.sock;
        #       # With php-cgi (or other tcp sockets):
        #       fastcgi_pass 127.0.0.1:9000;
        }

        # deny access to .htaccess files, if Apache's document root
        # concurs with nginx's one
        #
        location ~ /\.ht {
                deny all;
        }
}
Now lets make the dynmap server public!
After you followed the steps. We are going to make a shortcut of the dynmap web server config and put it in a folder.
ln -s /etc/nginx/sites-available/dynmap /etc/nginx/sites-enabled/dynmap
Make sure the config files are error-free!
nginx -t -c /etc/nginx/sites-available/dynmap
and restart the server if there are no problems.
sudo service nginx restart
And that should be it!
Put the web server ip into your web browser, you should see dynmap. Since it's going to be empty, you can start rendering tiles by joining the server and running the command /dynmap fullrender <worldname>
Setting up the web server that's hosted by a web host
If you are using a web host since you don't want to set one up yourself. This is the right section for you!
Copying the web folder to the web host
Copy the files from the minecraft server into a folder on your computer. The files you're going to be copying should be in plugins/dynmap/web on the minecraft server.
Copy the files to your web host preferably in a new directory unless it's going to be a dedicated dynmap webhost.
Finish!
Yeah really! You're done.
Bonus tutorials
If you installed your own NGINX web server, you can follow this part of the bonus tutorial to make your web server secure with dynmap logins. YOU SHOULD ALWAYS handle the user's credentials with care if you enable logins with Dynmap.
You can follow one of the three options to make your web server secure
Installing a FREE SSL certificate with CertBot
You can just follow these instructions from the certbot website. It is the easiest way to get an SSL certificate for a website.
As a note, certbot's certifications expires quicker than other providers, but they do have an automated way to renew your certifications if you follow their instructions on how to do that.
Installing an SSL certificate from a different provider
As an alternative, you can get an SSL certificate from a different provider such as NameCheap. Download the public certification and private key from the provider. YOU SHOULD NEVER SHARE THE PRIVATE KEY WITH ANOTHER PERSON OR MAKE IT PUBLIC. It is strictly for your web server and shouldn't just be up for grabs.
Place the certification file in /etc/ssl/certs/<certification_file>.pem
and place the private key in /etc/ssl/private/<private_key_file>.pem
Make a backup of the website config before we make any changes
sudo cp /etc/nginx/sites-available/dynmap /etc/nginx/sites-available/dynmap_BACKUP
If you make an oopsie and need to revert back, execute this command
sudo cp /etc/nginx/sites-available/dynmap_BACKUP /etc/nginx/sites-available/dynmap
In the NGINX website config, look at the differences between your current config and add the changes you see from this example config.
server {
        listen 80 default_server;
        listen [::]:80 default_server;
        server_name map.example.com;
        return 302 https://$server_name$request_uri;
}

server {
        # SSL configuration

        listen 443 ssl http2;
        listen [::]:443 ssl http2;

        ssl_certificate         /etc/ssl/certs/<certification_file>.pem;
        ssl_certificate_key     /etc/ssl/private/<private_key_file>.pem;

        server_name map.example.com;

        root /var/www/dynmap;

        index index.php index.html index.htm;

        location / {
                # First attempt to serve request as file, then
                # as directory, then fall back to displaying a 404.
                try_files $uri $uri/ =404;
        }

        # pass PHP scripts to FastCGI server

        location ~ \.php$ {
                include snippets/fastcgi-php.conf;

                # With php-fpm (or other unix sockets):
                fastcgi_pass unix:/var/run/php/php7.2-fpm.sock;
        #       # With php-cgi (or other tcp sockets):
        #       fastcgi_pass 127.0.0.1:9000;
        }

        # deny access to .htaccess files, if Apache's document root
        # concurs with nginx's one
        #
        location ~ /\.ht {
                deny all;
        }
}
Then you just need to restart the NGINX web server.
sudo service nginx restart
Go to your dynmap website and it should now be secure!

Setting up NGINX with Cloudflare's proxy (last updated Sept. 19 2019)
A good thing about Cloudflare's proxy is that they have a special certification that is only for communicating between your web server and their services. You can also let the certification last up to 15 years. However, it's just an alternative to having a "real" ssl certification.
First, login to cloudflare and go to the domain you want to set up the proxy with. Then go to the "SSL/TLS" section

In the Origin Certificates section, click on "Create Certificate".
Select Let Cloudflare generate a private key and a CSR and set the Private key type to ECDSA
Add the hostname map.YOURDOMAIN.com if you want to put the dynmap website on map.YOURDOMAIN.com.
Set the certificate validity to whatever you like (15 years sounds good amirite?).
Click next and you should see a fresh ssl cert and private key on your screen. Now we're going to copy the text and paste it into a file via terminal.
First lets create a certificate file and paste in the text. The text should start with -----BEGIN CERTIFICATE----- and end with -----END CERTIFICATE-----
sudo nano /etc/ssl/certs/dynmap_cert.pem
OR
sudo vi /etc/ssl/certs/dynmap_cert.pem
Next lets create a private key file and paste in the text. The text should start with -----BEGIN PRIVATE KEY----- and end with -----END PRIVATE KEY-----
sudo nano /etc/ssl/private/dynmap_private_key.pem
OR
sudo vi /etc/ssl/private/dynmap_private_key.pem
Now we are going to edit the NGINX website config. Make a backup of the website config before we make any changes
sudo cp /etc/nginx/sites-available/dynmap /etc/nginx/sites-available/dynmap_BACKUP
If you make an oopsie and need to revert back, execute this command
sudo cp /etc/nginx/sites-available/dynmap_BACKUP /etc/nginx/sites-available/dynmap
In the NGINX website config, look at the differences between your current config and add the changes you see from this example config.
server {
        listen 80 default_server;
        listen [::]:80 default_server;
        server_name map.example.com;
        return 302 https://$server_name$request_uri;
}

server {
        # SSL configuration

        listen 443 ssl http2;
        listen [::]:443 ssl http2;

        ssl_certificate         /etc/ssl/certs/dynmap_cert.pem;
        ssl_certificate_key     /etc/ssl/private/dynmap_private_key.pem;

        server_name map.example.com;

        root /var/www/dynmap;

        index index.php index.html index.htm;

        location / {
                # First attempt to serve request as file, then
                # as directory, then fall back to displaying a 404.
                try_files $uri $uri/ =404;
        }

        # pass PHP scripts to FastCGI server

        location ~ \.php$ {
                include snippets/fastcgi-php.conf;

                # With php-fpm (or other unix sockets):
                fastcgi_pass unix:/var/run/php/php7.2-fpm.sock;
        #       # With php-cgi (or other tcp sockets):
        #       fastcgi_pass 127.0.0.1:9000;
        }

        # deny access to .htaccess files, if Apache's document root
        # concurs with nginx's one
        #
        location ~ /\.ht {
                deny all;
        }
}
Then you just need to restart the NGINX web server.
sudo service nginx restart
Go to your dynmap website and it should now be secure!
FAQ's
How do I Linux?
Very carefully.
But here is the serious answer.
You can connect to your linux server with something popular like PuTTY or any other SSH client of your choice. You can login to the terminal if you have the user/password.
You can easily find guides/tutorials on how to use linux on the internet. But you should always double check what a command does before you execute it!
My website isn't popping up (NGINX)
Make sure that your website is port forwarded.
The default port would be 80 but if you followed the tutorial on installing an SSL certification, the port would be 443.
But if that doesn't work, check if NGINX is running by running the command
sudo service nginx status
and it should tell you what might be wrong. You can also test the config file by running the command
nginx -t -c /etc/nginx/sites-available/dynmap
I don't see any images on the dynmap website!
Since we started with a fresh new database without any data in it. It might take some time to see any images on dynmap.
You can run the command in-game to fully render a world if you'd like /dynmap fullrender <worldname>
How come there's no tutorial with windows or apache?
I decided not to cover setting up a standalone web server with windows or apache since most people are going to be using Linux and NGINX nowadays. But if there are enough people asking, I might cover windows and/or apache
I changed my mind, can I convert back from sql?
Yes, you should be able to convert back to the previous method if you created a backup file configuration.txt.backup from the previous steps.
Just delete configuration.txt and rename configuration.txt.backup to configuration.txt and you're all good to go!
Why?
Because why not?
There are more possibilities when dynmap uses sql. It would be faster to backup, people can still use the dynmap website even if the server is down, and more!
Does it still show player icons and/or chat?
Yes, the player icon should still be updated on the webpage.
The chatbox should also work fine as well.
Leave a comment if you have any questions or problems!
 haloflooder
All 38 comments
Note that dynmapforge users won't have a plugins/dynmap/web directory. For example, on one of my servers there is:
username@hostname:/srv/minecraft/instancename$ find dynmap/ -type d | grep -v dynmap/web/tiles
dynmap/
dynmap/web
dynmap/web/images
dynmap/web/standalone
dynmap/web/css
dynmap/web/css/images
dynmap/web/js
dynmap/templates
dynmap/texturepacks
dynmap/texturepacks/standard
dynmap/markers
dynmap/renderdata
dynmap/renderdata/modsupport
dynmap/export
dynmap/colorschemes
(I'm filtering out dynmap/web/tiles/ because I have 1500 directories there...)
I'd try this out myself, but my nginx and minecraft services are on different machines. :sweat_smile:
 miiichael
on 2 Nov 2019
miiichael
on 2 Nov 2019
I followed this through, but with no luck. I have Apache on the same server as dynmap, and moved the web folder there. Although there aren't any errors in the console, if I navigate to the url, it just shows a black background. I'm also using SQLite, which was already rendered. Have I missed something perhaps?
 MrLogano
on 14 Nov 2019
MrLogano
on 14 Nov 2019
Maybe check your browser's console to look for errors and/or failed requests?
miiichael
on 16 Nov 2019
@miiichael
Yeah, the big issue with going from filesystem to a database is that dynmap doesn't import the tiles to a database. So you would lose all your rendering progress. It's still possible to put the webserver on a different machine from the minecraft server but it requires you to use mysql instead of the filesystem.
@MrLogano
It's because apache can't find the SQLite database file since it's not in the web folder. You're probably better off pointing apache to the web folder that's in the dynmap folder instead of copying the web folder to a different location. Or manually edit the php files (from the copied web folder) to get the SQLite db file from a different location.
I'll write up a more detailed tutorial once I get some free time as I'm pretty busy atm.
haloflooder
on 16 Nov 2019
@haloflooder
The php file "dynmap_access" links to the SQLite database file in the dynmap directory. I tried it a few more times, and whenever I change the URL section in the config, I just get a completely blank page. Leaving that out, the filetree works fine, but pointing it to the SQLite throws a 500 error. Checking the apache log says something unable to open the database file, with it showing an error on line 79 in SQLite_tiles.php. I did change the permissions to 775 too, with no luck.
MrLogano
on 16 Nov 2019
I follow your tutorial, but the webpage said "Could not retrieve configuration: Internal Server Error"
how can i do?
 gundami
on 16 Dec 2019
gundami
on 16 Dec 2019
I'm having the same issue as @gundami. Further investigation reveals this error message in /var/log/nginx/access.log:
10.0.0.52 - - [24/Jan/2020:20:31:26 +0000] "GET /standalone/MySQL_configuration.php HTTP/1.1" 500 5 "http://dragonmc/" "Mozilla/5.0 (X11; Fedora; Linux x86_64; rv:72.0) Gecko/20100101 Firefox/72.0" "-"
 ads103
on 24 Jan 2020
ads103
on 24 Jan 2020
@MrLogano Have you figured out a solution? Sorry for the late reply, I've been incredibly busy for the past few months.
@gundami @ads103 Can you provide the config for dynmap on pastebin? Don't forget to censor any sensitive information like the mysql credentials.
haloflooder
on 24 Jan 2020
Sure! Here you go: https://pastebin.com/1xQ2Unjb
ads103
on 25 Jan 2020
@ads103 Just noticed that your access log says http://dragonmc/. What do you have in your nginx config?
haloflooder
on 25 Jan 2020
Since it's also been a while since dynmap updated. I'll install a new version on dynmap on my test server and follow my own guide to see if anything changed since September.
haloflooder
on 25 Jan 2020
Yeah, dragonmc is the hostname of my minecraft server. I have it in a local DNS server, so I can just type in "dragonmc" in my web browser and browse to it. Here's my apache config, and the directory I copied my dynmap files to.
https://pastebin.com/NQ8fNjqa
ads103
on 25 Jan 2020
@ads103 I'm guessing your server is also hosted locally on your network?
haloflooder
on 25 Jan 2020
Yep! That's correct. Everything's just a local IP away!
ads103
on 25 Jan 2020
@haloflooder did you have a chance to install a new version on your test server?
ads103
on 8 Feb 2020
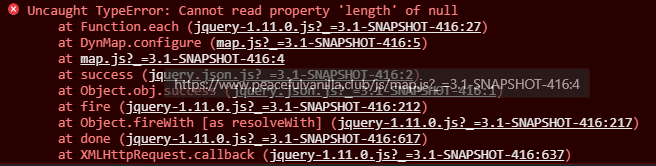
Unfortunately, I don't know javascript. I can see that this error message is being generated by this function in map.js, but I can't find where the variable "configuration" is assigned a value.
`function DynMap(options) {
var me = this;
if(me.checkForSavedURL())
return;
me.options = options;
$.getJSON(me.options.url.configuration, function(configuration) {
if(configuration.error == 'login-required') {
me.saveURL();
window.location = 'login.html';
}
else if(configuration.error) {
alert(configuration.error);
}
else {
me.configure(configuration);
me.initialize();
}
}, function(status, statusMessage) {
alert('Could not retrieve configuration: ' + statusMessage);
});
}
`
ads103
on 8 Feb 2020
@ads103 Sorry, I've been busy with work since I had to meet a deadline for something. The configuration comes from MySQL_configuration.php in standalone.
Did you copy over the web files to the webserver after letting dynmap change the config values with the modified configuration?
haloflooder
on 9 Feb 2020
Yes, I did. I even saw network traffic to my database server rise as it started to render, so the config values are at least correct enough to get tiles _into_ the database.
Here's a question. In the guide, you included this instruction for copying the web folder's contents to the web server:
sudo cp -r /home/MyUsername/minecraft/servers/creative/plugins/dynmap/web/ /var/www/dynmap/
Did you intend to copy the web folder into the dynmap folder, _or_ the web folder's _contents_ into the dynmap folder?
ads103
on 9 Feb 2020
@ads103 Oooo, that's a good catch. Should've proof read the linux commands after working on the guide for about 12 hours.
haloflooder
on 9 Feb 2020
I was meaning to put a command to copy the content in the web folder into the dynmap webserver folder. I'll be going over my own guide today with the newest version of dynmap later today.
haloflooder
on 9 Feb 2020
Any update on the MySQL access settings? After following this guide to the T and attempting to access the map, I get a black screen and the error "Could not retrieve configuration: Bad Gateway".
 WearisomelyVerbose
on 17 Feb 2020
WearisomelyVerbose
on 17 Feb 2020
EDIT: I'm an idiot and forgot to install php, all is good
First off, amazing guide! I've been trying to find something like this for a while now. I am however having the same issue as @WearisomelyVerbose where I only get a message saying "Could not retrieve configuration: Bad Gateway"
Some Info about my build: My Minecraft server is on a separate server, and uses a Mysql server to store everything. I made sure to copy over the /web directory from Dynmap after changing configs and restarting the server.
One thing I did notice, whenever I test the Dynmap.conf file in Nginx, I get this error:
sudo nginx -t -c /etc/nginx/sites-available/dynmap
nginx: [emerg] "server" directive is not allowed here in /etc/nginx/sites-available/dynmap:2
nginx: configuration file /etc/nginx/sites-available/dynmap test failed
 turpinj22
on 17 Feb 2020
turpinj22
on 17 Feb 2020
@ads103 @gundami
I think I have the same error: "Could not retrieve configuration: error" after opening the map over the webserver.
For me changing the file "...\standalone\MySQL_config.php" on the webserver solved the issue:
...
$dbhost = 'localhost';
...
instead of the IP-address. But I do not know the details, hopefully it helps someone.
My setup btw is 2 Raspberry Pis. RP4B(4GB) hosts minecraft (among other services) and a RP3B+ hosts DynMap (Apache+SQL)
Thanks for the great tutorial!! :)
 IzeRecord
on 24 Feb 2020
IzeRecord
on 24 Feb 2020
I was able to resolve my issues.
Mine, at least, were pretty simple in hindsight. I was missing dependencies.
Specifically, I was missing php-json and php-mysqlnd. (I'm on a Fedora 31 system, and the Ubuntu package names are a little different.)
I found out that I was missing these packages by realizing that php-fpm was a seperate application with its own log files located in /var/log/php-fpm. Checking out www-error.log revealed these two log lines:
[24-Feb-2020 14:52:43 UTC] PHP Fatal error: Uncaught Error: Call to undefined function mysqli_connect() in /usr/share/nginx/html/dynmap/standalone/MySQL_funcs.php:28
Stack trace:
#0 /usr/share/nginx/html/dynmap/standalone/MySQL_funcs.php(38): initDbIfNeeded()
#1 /usr/share/nginx/html/dynmap/standalone/MySQL_funcs.php(63): getStandaloneFileByServerId('dynmap_config.j...', 0)
#2 /usr/share/nginx/html/dynmap/standalone/MySQL_configuration.php(22): getStandaloneFile('dynmap_config.j...')
#3 {main}
thrown in /usr/share/nginx/html/dynmap/standalone/MySQL_funcs.php on line 28
[24-Feb-2020 15:00:54 UTC] PHP Fatal error: Uncaught Error: Call to undefined function json_decode() in /usr/share/nginx/html/dynmap/standalone/MySQL_configuration.php:26
Stack trace:
#0 {main}
thrown in /usr/share/nginx/html/dynmap/standalone/MySQL_configuration.php on line 26
A quick google search for the functions json_decode() and mysqli_connect() lead me to these two missing packages. After installing them and refreshing Dynmap in my browser, it... just worked. It just worked.
ads103
on 24 Feb 2020
Thanks for the tutorial! I was able to migrate my 2 Forge servers to the standalone web server configuration. And I'd like to point out a few things:
Forge does not include the JDBC driver for MySQL (like Bukkit and Cauldron do). You need to grab it from https://mvnrepository.com/artifact/mysql/mysql-connector-java and drop it in the mods directory. See #1674.
It would be better to mention in the tutorial that
/etc/nginx/sites-available/and/etc/nginx/sites-enabledonly exist in Debian/Ubuntu's nginx implementations. In the upstream implementation the only configuration file is/etc/nginx/nginx.conf.I would recommend against using MySQL for map storage, unless you have dedicated hardware acting as the MySQL server. I have 2 Forge servers running on my home server. The one configured with MySQL has significantly more CPU, RAM and disk I/O overhead due to transactions with the database. In fact, MySQL was not designed to store BLOBs, which make up almost all of dynmap's map storage. By using MySQL as map storage, extra CPU cycles are consumed by SQL transactions. And because dynmap stores map data as image BLOBs, using MySQL actually results in way worse performance than file storage, as observed on my home server. See also https://stackoverflow.com/questions/5285857/when-is-using-mysql-blob-recommended
Guess what type of DB was designed to store a large number of BLOBs? The file system! I'd like to propose editing the tutorial to recommend nginx + php-fpm + file storage. For a standalone web server with file storage, the
url:section should be changed like this:
url:
    # configuration URL
    configuration: 'standalone/dynmap_config.json?={timestamp}'
    # update URL
    update: 'standalone/dynmap_{world}.json?={timestamp}'
    # sendmessage URL
    sendmessage: "standalone/sendmessage.php"
    # login URL
    login: "standalone/login.php"
    # register URL
    register: "standalone/register.php"
    # tiles base URL
    tiles: 'tiles/'
    # markers base URL
    markers: 'tiles/'
 database64128
on 4 Mar 2020
database64128
on 4 Mar 2020
Another thank you @haloflooder for making the tutorial! I migrated too, and it works well.
I also found the setup kindly shared by Frumple for the MRT server useful: https://github.com/Frumple/mrt-docker-services/blob/master/containers/dynmap-main/docker-compose.yml
@database64128 Thanks for the info on the json config files. One amendment though: the json config files are only created if login-enabled: false is set inside Dynmap's configuration.txt.
Bug? Intentional? I don't know. More info on the issue I created here: https://github.com/webbukkit/dynmap/issues/2848.
I thought I'd mention it here because it took me a long time to track down why the json config files weren't being created!
 aSemy
on 11 Apr 2020
aSemy
on 11 Apr 2020
I'm having the black screen issue that @MrLogano described. I'm using MySQL and nginx on a separate server. I'm performing a fullrender right now and I can see the row count in the "Tiles" table in MySQL growing, so I know it's connecting to MySQL just fine.
In the browser console, I see the following errors:
The script from “https://REDACTED/standalone/config.js?_=3.0-beta-10-257” was loaded even though its MIME type (“text/html”) is not a valid JavaScript MIME type.
Loading failed for the
@alex17lol This guide does not use a reverse proxy. You should be able to use your own Apache config instead of the suggested Nginx configs here.
I dont have access to sudo commands I use a web host thats my problem
 alex17lol
on 17 May 2020
alex17lol
on 17 May 2020
_Can someone add this to the wiki?_
Thank you so much for making this!
 ice-fly
on 18 May 2020
ice-fly
on 18 May 2020
SELinux can cause all sorts of grief. Most obvious are the ones that outright block all access to web content. These show up in the web server error log. More subtle issues can show up in the php-fpm error log. After dealing with all the errors in the web server log, I still had black screen issues and the dreaded failure to read configuration. For example:
[01-Jun-2020 17:45:44 UTC] PHP Warning: mysqli_connect(): (HY000/2002): Permission denied in /home/data/web/dynmap/standalone/MySQL_funcs.php on line 30
# grep mysql /var/log/audit/audit.log | tail -1 | tee /dev/stderr | audit2allow
type=AVC msg=audit(1591033906.504:2725): avc:  denied  { name_connect } for  pid=717 comm="php-fpm" dest=3306 scontext=system_u:system_r:httpd_t:s0 tcontext=system_u:object_r:mysqld_port_t:s0 tclass=tcp_socket permissive=0


#============= httpd_t ==============

#!!!! This avc can be allowed using one of the these booleans:
#     httpd_can_network_connect, httpd_can_network_connect_db
allow httpd_t mysqld_port_t:tcp_socket name_connect;
What fixed this final puzzle for me was:
# setsebool -P httpd_can_network_connect_db=1
 kbulgrien
on 1 Jun 2020
kbulgrien
on 1 Jun 2020
I found rsync to be MUCH faster than scp -r. scp was plodding along at an abysmally slow rate, so I killed it at 300MB or so and then used the following command instead. 2TB transferred incredibly fast compared to the scp attempt. I did rsync quite a few times while trying to resolve issues, and rsync updated without sending the whole mess every time.
rsync -cavzAX me@$VPS:/path/to/plugins/dynmap/web/ /path/to/web/dynmap/
kbulgrien
on 1 Jun 2020
Has anyone tried this with a DB2 database yet?
 Griefed
on 13 Jun 2020
Griefed
on 13 Jun 2020
I could really use some help with this ^^^ #3125 issue. can anyone help with this issue? I triple checked this guide. started from scratch mutliple times. have tried multiple hosting solutions but I get the same problem every time. I tried some solutions noted in the comments but they were ultimately unhelpful.
I also tried discord but got no response multiple times.
 arkD
on 20 Sep 2020
arkD
on 20 Sep 2020
@arkD Luckly, I will be revising this guide in the next couple of weeks since I'm setting up another standalone setup but using the latest bleeding edge version of Dynmap for 1.16.3 which isn't released publicly on the spigot page yet as an update.
haloflooder
on 28 Sep 2020
Wasn't working for me - i had to enable php on NGINX using this guide
https://www.digitalocean.com/community/tutorials/how-to-install-linux-nginx-mysql-php-lemp-stack-in-ubuntu-16-04
Now the error "Could not retrieve configuration" stopped appearing, but i still get a black screen, no sidebar, no clock. 😢
DB is configured to sqlite and everything was working and rendered before starting the guide
Also: i have this error in console. It's very likely related
 Leonardo-Fiori
on 29 Oct 2020
Leonardo-Fiori
on 29 Oct 2020
Related issues
 thetakodev
·
4Comments
thetakodev
·
4Comments
 Marbel
·
3Comments
Marbel
·
3Comments
 uncovery
·
7Comments
uncovery
·
7Comments
 Lachney
·
3Comments
Lachney
·
3Comments
 idlenexusgaming
·
4Comments
idlenexusgaming
·
4Comments
Most helpful comment
Thanks for the tutorial! I was able to migrate my 2 Forge servers to the standalone web server configuration. And I'd like to point out a few things:
Forge does not include the JDBC driver for MySQL (like Bukkit and Cauldron do). You need to grab it from https://mvnrepository.com/artifact/mysql/mysql-connector-java and drop it in the mods directory. See #1674.
It would be better to mention in the tutorial that
/etc/nginx/sites-available/and/etc/nginx/sites-enabledonly exist in Debian/Ubuntu's nginx implementations. In the upstream implementation the only configuration file is/etc/nginx/nginx.conf.I would recommend against using MySQL for map storage, unless you have dedicated hardware acting as the MySQL server. I have 2 Forge servers running on my home server. The one configured with MySQL has significantly more CPU, RAM and disk I/O overhead due to transactions with the database. In fact, MySQL was not designed to store BLOBs, which make up almost all of dynmap's map storage. By using MySQL as map storage, extra CPU cycles are consumed by SQL transactions. And because dynmap stores map data as image BLOBs, using MySQL actually results in way worse performance than file storage, as observed on my home server. See also https://stackoverflow.com/questions/5285857/when-is-using-mysql-blob-recommended
Guess what type of DB was designed to store a large number of BLOBs? The file system! I'd like to propose editing the tutorial to recommend nginx + php-fpm + file storage. For a standalone web server with file storage, the
url:section should be changed like this: